Monday, February 21, 2011

LEGO Party: Everything Else

This is the last post telling you about our LEGO birthday party. Decorations are not my thing. If you have seen my house, you know that. So our decorations weren't artsy, they were simple. My birthday boy suggested that we gather some vases and put LEGO pieces in them. Great idea! 


The wrapping for our gift was not planned. It just happened when I went to wrap his present late at night before his birthday and realized we didn't have any wrapping paper. The brown paper was the best thing we had, but then I remembered reading about a LEGO font when I was looking for ideas for our party. I printed the above (plus his name), outlined it with a yellow Sharpie, cut it out, and glued it to a piece of red construction paper. He loved his impromptu wrapping paper (and the LEGO gift inside).


To entertain our guests we planned several activities. We had LEGO coloring pages ready to color with our LEGO shaped crayons. We had a contest to see who could make the most realistic looking LEGO from playdough. This picture shows the winning pieces from the adult contestants.


We played a LEGO version of "Hot Potato". We also had the classic "Guess the Items in the Jar", and of course we used LEGO pieces. We ended with several fun games of LEGO BINGO. The kids did not want to stop playing this!


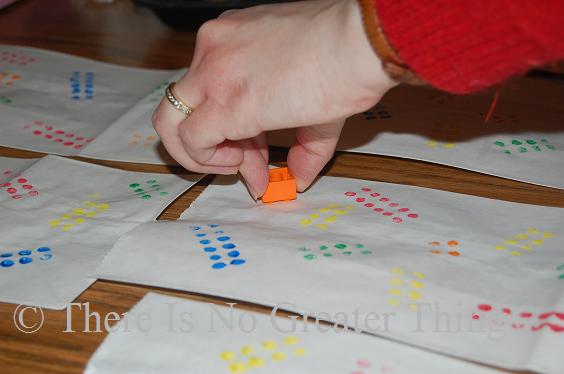
Our goody bags contained the crayons, soap, and candy I made. The decorations on these bags may be the only original thing I did for this party. I am still surprised that it looked pretty good in the end. I used my kid's washable paint and painted the actual LEGO bricks, and then I stamped them on the paper bags. 


When the paint was dry, I drew the outline of the brick with colored markers. Then I added some curling ribbon, and after my husband showed me again how to curl ribbon with scissors, I did my best to curl them.


If you are able to use any of these ideas for your LEGO party, I would be thrilled if you could leave a comment to tell me how it worked for you!

Friday, February 18, 2011

Introduction to the Holimonth

I have decided to start celebrating "holi-months" instead of holidays at our house. I have so many ideas for things I want to do for upcoming holidays, but some times the holiday sneaks up on you or some times some one gets sick or some times the unexpected just steals your time. And before you know it, it is suddenly February 15th! Valentine's Day has come and gone and although you have completed and handed out the valentines, you haven't got around to the heart artwork you wanted to do nor the heart gingerbread cookies (which are left over from Christmas because I was sick and my husband had to do them with the kids, and although I am so glad he was willing and able to do it, even he admitted they just weren't quite the same).


When I was deciding last night what to do for art today, I thought that maybe I should just get a head start on St. Patrick's Day and everything green. Or maybe we could do some flowers, because it does feel like spring here with the snow melted and all. But being the only female in the house, I take every opportunity I can get to paint pink and purple hearts. I have to balance out all those guns and trucks and yelling and all sorts of boy stuff, with some pink hearts -- at least for my sanity. So for today, February 18th, we painted hearts in celebration of Valentine's Day. I got the idea to have my boys mix red and blue to make purple and then white to make shades from Art Projects for Kids blog. Since I wasn't sure they would do as well with the small heart print out, I made heart templates from cereal boxes for them to trace onto large paper. After they traced as many hearts as they wanted, I gave them their paints, showed them how to mix them without mixing it all into one color (which you know is going to happen in the end anyway), and let them at it.


Happy Valentine's Month!

Wednesday, February 2, 2011

February Sensory Bin

Here is our February sensory bin. It is Valentine's Day themed with winter leftovers. Our January sensory bin wasn't quite as fun as I imagined it being, so I changed the cotton balls out for white beans. My original intention was to keep the same basics and add in some Valentine's Day colors and shapes, but I didn't go with that plan. Actually, I was forced to use only what I had on hand because we are actually snowed in (my husband is digging us out as I type).


I started with three pounds of great northern beans. I put the white plastic doves and silver bells from January's bin back in. Then I added red plastic jewels, pink and purple pom poms, red feathers, red and white pony beads, heart shaped erasers, and red yarn bows.


The "scoops" are the tools my boys use the most with these bins. Our scoops for this month our two clean laundry detergent caps, a red baby bottle cap, and a pink popsicle mold bottom. I can almost guarantee that the baby bottle cap and popsicle bottom will be what they fight over. Why buy new scoops when they prefer these random odds and ends?

Thursday, January 27, 2011

LEGO Party Food

My son recently had a LEGO-themed birthday party. I shared here about the LEGO crayons and soaps I made for the party. We also had LEGO shaped food to eat. You know it tastes better in that shape!


Both adults and children were invited to our party, and to make lunch easier, I made two pizzas for the adults before the party. I made each pizza crust in a 9x13 pan. One pizza had eight slices of canadian bacon and the other had round slices of american cheese on top of the mozzarella cheese. Somehow during the excitement of the party I didn't get a picture of these until they were already cut and half eaten.

It was supposed to look like a LEGO brick.

The kids got to make their own LEGO shaped pizzas. I planned to make them resemble the common 4x2 LEGO brick by placing eight pieces of pepperoni on top. However, that ended up making a pretty big individual pizza, so I made several different sized pizza crusts for the kids to choose from.


Before the party I cut american cheese slices into circles using a small Tupperware container. I separated them with wax paper and set them out for the kids to use. Apparently the lure of pepperoni was stronger than the time I spend cutting out numerous cheese circles, because only a couple cheese circles were used. But that's OK, we used them on the leftover crust for lunch the next week!


We also had Jell-O jigglers shaped like LEGO bricks and men.


We had plenty of candy bricks and men made from candy melts. Don't look too close or you will see the tiny parts of the studs on the bricks that are missing because I could not get the LEGO trays dry in between batches of candy.


And, of course, we used the LEGO Ice Cube Trays to make some ice too.


I had some other plans for the birthday cake, but as time ran out I decided to do cupcakes. This made it the easiest birthday cake I have done for my kids. The magic was all in the 1M decorating tip that I used. If you can squeeze the bag of frosting and move your hand in a spiral, you can make these too with this tip.


If I had to do it again, I would have had the party in the afternoon and skipped the pizzas. I forget that other kids don't have the appetite my boys do. Or maybe it was just that they were so excited about the games that they couldn't eat. Probably not, but if you want to see what we did for decorations, games, and party favors, check back later for my last LEGO birthday party post.

Tuesday, January 25, 2011

Favorite Books: Mike Mulligan and His Steam Shovel

I love a good story. So does my husband. So do my children. The best stories are the ones that are enjoyable for all of us. They are the kind of books we can read over and over again and still want to read more. In reading them over and over the characters become real friends, and we often refer to them as if they were part of our extended family. "Favorite Books" is the place on this blog where I share these books with you.

I wanted to get Katy and the Big Snow from the library today, but as it was checked out I chose Mike Mulligan and His Steam Shovel which is written by Virginia Lee Burton.


This picture book is about, well, Mike Mulligan and his steam shovel named Mary Anne. This digging team has been replaced by gasoline, electric, and diesel shovels, and they can't find anyone who will hire them. They hear about a job in Popperville and decide to recommend themselves for the job. You will have to read this classic book to find out what happens to Mike and Mary Anne. In the meantime, here are some of my favorite quotes from Mike Mulligan and His Steam Shovel.

Mike Mulligan was very proud of Mary Anne. He always said that she could dig as much in a day as a hundred men could dig in a week, but he had never been quite sure that this was true.

Now the girl who answers the telephone called up the next towns of Bangerville and Bopperville and Kipperville and Kopperville and told them what was happening in Popperville.

'Hi! Mike Mulligan! How are you going to get your steam shovel out?'

The book ends with this nice little note to the reader:

Now when you go to Popperville, be sure to go down in the ...

Oh, wait, I can't give away the end of the story. You have to read it to find out what happens!


Thursday, January 20, 2011

LEGO Crayons and Soaps

My son had a LEGO themed birthday party this year. I made the party favors, games, and LEGO themed foods myself. I am going to share how I made the LEGO shaped crayons and soap which we used during the party and included in the party favor bags.


I am not a creative person naturally, but I can be resourceful. I got most of my inspiration from the Super Awesome Lego Party. They even made the mold which they used to make the soaps! I certainly didn't have the gumption to make my own molds, so I purchased ice cube trays made by LEGO. 


Since I wanted my crayons to be solid colors that would resemble real LEGO bricks, I placed each color crayon in its own tin can (which my wonderful husband pulled out of the recycling bin and washed for me -- thanks!). After I determined about how many melted crayons it would take to fill the mold, I melted those crayons in the cans in the oven. I then simply poured the melted wax into the molds and let it cool. Since the ice cube tray is made from silicone, I was able to push the crayons out after they cooled. I made enough crayons for each guest to have some in their goody bag and to color LEGO coloring sheets at the party.


The LEGO shaped soap turned out surprisingly easy. I have never made soap, and so the idea of making soap sounded difficult to me. It was actually easier than the crayons! I bought some melt-and-pour glycerin soap and some soap coloring at Hobby Lobby. It was so simple; I just popped some cubes into a glass measuring cup, microwaved them until melted, added the color, and poured into the mold. 


The soap cooled within an hour, and popped out of the molds with little effort. The soap left no noticeable residue in the molds, so I didn't even wipe them out between colors.


As I was bagging them up for the party favors, my birthday boy suggested that we cut them into other LEGO brick shaped pieces. I wasn't sure how it would work, but I tried it and it worked great. The soap cuts easily with a sharp knife, and the different shaped pieces made the bricks resemble real LEGO bricks more.


Tuesday, January 18, 2011

Silly Little Boy

My son prefers to use our bathroom trash can for most of his disposal needs. Like most families, we do have a regular sized trash can in the kitchen. It still amazes me that when he is near the kitchen (or even in the kitchen) he will still set off toward the bathroom to throw something away. Maybe he forgets about the other trash cans when he doesn't see them. Maybe he prefers the bathroom trash can because it is small and just his size. Maybe he welcomes another opportunity to catch a whiff of the vanilla scented trash bags that are only in the bathroom. I don't know why he does it, but he always does it.

Now let me set the scene for this particular trash can visit. He had been playing with a large sand castle bucket, and it broke. (He was obviously not putting sand into it. In fact, I have no idea what he and his brother were doing with it when it broke, since it was a pretty sturdy bucket.) Nevertheless, after his initial disappointment about it being broken, he decided that it would need to be thrown away. After this decision I left to do something else and didn't give it another thought until I went into the bathroom and saw this.


Maybe it is just me, but every time I look at this picture I laugh and laugh and laugh. It is so funny to me that he would put into the bathroom trash can a broken bucket that may actually be bigger than the trash can itself. You are so very, very funny, my silly little boy!